Step A
The first thing I do to test a new digital camera is just go out and make pictures with it. I read the manual and figure out the basic operations, then spend as much time as I can making the kinds of pictures I like to make. I keep reading the manual to find new features and try them out to see which ones I’ll find useful.
The reason this is so important with a digital camera is that when you buy one, you aren’t just getting a new piece of hardware whose ergonomics you need to learn. You’re also in effect buying the film supply you’ll be using for the life of the camera. Even if you’ve upgraded to a new model of the same brand you’ve been using, the new updated sensor will not only have more pixels, but a new image character. It’s going to take time to get used to that character, and only real pictures, not abstract tests, will show what you can do with it. Don’t go straight to tests of lens resolution or AF accuracy or speed, and try to refrain from pixel peeping the shots at 100% view. Just see what pictures you can make with it.
This was important with the camera I bought recently. First, I’d gone to a different manufacturer’s line so not only the camera and imaging sensor were new, but also the pair of lenses I got at the same time. On top of that, the lenses were a return to compact prime focal lengths from the massive zoom lenses I’ve been working with for nearly three years. I wanted to get used to the new equipment by making pictures. So that’s Step A. You can see a few of the pictures from that exploration over on my web log. After about a week and some 1300 captures I was getting really comfortable with the camera and lenses. I discovered new, or new-to-me, features that I really liked and others that don’t interest me at all. I’ll get to that in another post. So it was time for:
Step B: The Paper Towel Test
My impression from that shooting was that the new Pentax K10D had a longer tonal range than the Olympus E-1 I’d been using. This is a welcome, but not surprising development given there have been more than three years of technical development between the two release dates. Tonal range is important, and it is a major task for the elves who design our equipment to give us more pixels without compromising tonal range. Time for an objective test. I think this test is vital for anyone with a digital camera because it relates directly to a specific technique that lets you determine the best possible exposure in situations where the tonal range challenges the ability of the sensor. I raided the kitchen for a paper towel and taped it to a window. Bounty is a good brand because it has a strong embossed pattern. With the longer of its two lenses mounted and the metering set to spot, I put the camera on a tripod facing squarely at the paper towel, close enough to fill most of the frame with towel. In manual mode, set to record in-camera DNG RAW files, I found the “correct” exposure and shot a capture. Then one stop over, two stops over, then 2.3, 2.7, etc. all the way to four stops over. Then a second exposure in the middle (makes the set easier to understand on screen in a browser) and repeated the same procedure going down four stops.
Next step, download to the computer, let Bridge build a cache for the folder, then highlight the middle-to-over set and hit
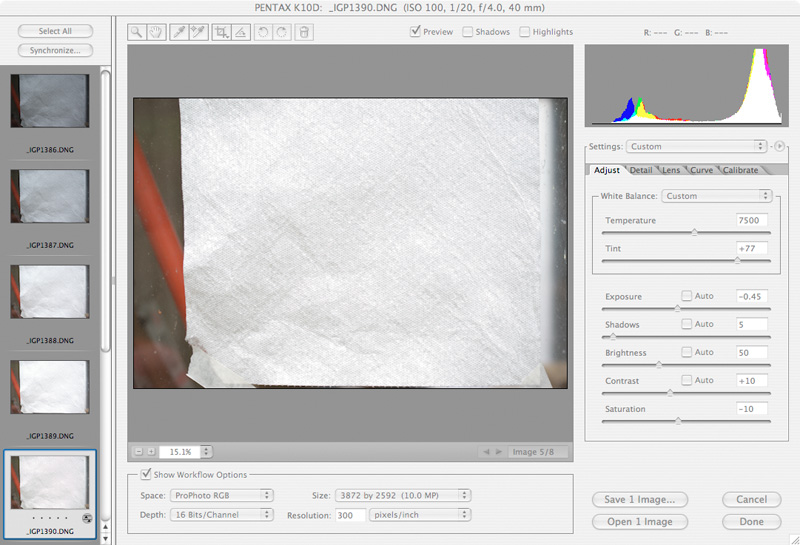
(Note: sharp-eyed readers familiar with ACR will notice some very strange white balance numbers up there—I'll discuss that in another post.)
So I tried the 3-stops-over shot, and found it preserved fully convincing detail with –75. That’s a lot of move on the exposure slider, but not so much that the quality of the file will be compromised badly. But at 3.3 the party’s over. Even –125 recovers only partial data. There’s texture, but it’s really ugly. Past that point ACR starts inventing, not recovering, data and I don’t find it convincing.
Next I dropped out of ACR and repeated the Bridge procedure to view the dark set in ACR. The surprise here was that the paper texture was clear and distinct right down to four stops under. I clicked on the darkest one just out of curiosity and found it bunched at, but not against, the left side of the histogram, no clipping at all. Perhaps I should have gone out and made more shots to see how low the K10D can go, but really that’s all the answer I needed. I did spend a little time using the ACR controls to see how far I could bring up the two to three stop underexposed captures with convincing results. That’s a preview of what I’ll be doing to bring up underexposed sections of real-world pictures that were set to the most exposure possible without losing the highlights.
So, now I had numbers to confirm my sense that I was seeing a greater tonal range. Here’s the technique that this test lets you use. Let’s say you are making a picture of a meadow on an overcast day with interesting texture and pattern in the stormy sky, using this camera. The camera’s built in meter will almost surely overexpose the sky. If you set the right exposure for the meadow manually, you can bet the sky will burn out. So flip the meter to spot, meter the sky, and set it 2.7 stops over. We know that a –45 Exposure compensation in ACR will retain full detail, so this is the maxium exposure you can give the rest of the picture without losing the sky. If a histogram check shows the shadows are still clipped, go for that extra third of a stop that will call for even more rescue in ACR. Easy, as long as you’ve tested to find your camera’s limit at the top end.
That is Step B. Next time—Step C, which in my case was to check out the K10D’s anti-shake, which is a feature I’ve never had in previous cameras.
Posted by CARL WEESE
No comments:
Post a Comment